|
| |
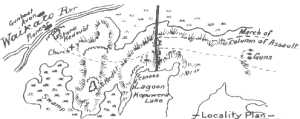
The Battle of RangiririThe application of artillery in the New Zealand Land WarsOn 20 November 1863, General Cameron's British forces attacked the Maori fortifications at Rangiriri on the edge of the Waikato River. The fortifications, designed by Te Wharepu, had been constructed entirely of earthworks on an isthmus between the Waikato River and Lake Waikare in an effort to resist General Cameron. They extended from water to water as shown in the locality plan and consisted of rifle-pits and double trenches.
The British planned to attack on two fronts simultaneously: a land attack on the front of the main position, and an attack from steamers on the southern ridge. The "Pioneer" and "Avon" carried the Headquarters of the 40th Regiment, and four armoured gunboats carried soldiers and sailors from Mangatawhiri. Troops from Meremere marched along the riverbank.
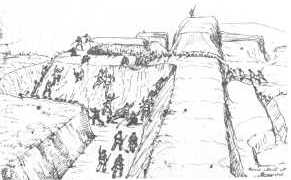
About 850 men eventually assembled on the afternoon of the 20th November: The attack began with an artillery bombardment at a range of about 700 yards, and fire from the gunboats, and continued for nearly two hours. The earthworks were virtually undamaged but heavy casualties were sustained in the crowded trenches and pits. Four companies of the 65th Regiment with a detachment of Royal Engineers and the 14th Regiment attempted an assault on the trenches and forced the defenders to fall back from the first line of defences to the second line of rifle-pits which was also soon over-run. With the outer works under the attackers' control, the defenders were crowded into the central redoubt which was surrounded by a wide ditch about 17 feet deep.
Late in the afternoon, the 40th Regiment captured a series of entrenchments on a spur above the pa and detachments of the 65th Regiment attacked escaping defenders. The main body of the 65th and 14th attempted to storm the central redoubt but failed because their ladders were too short to reach the top of the parapets. General Cameron ordered Captain Mercer, of the Royal Artillery, to storm the redoubt with 36 of his men armed with revolvers and swords. Captain Mercer was fatally wounded and Sergeant Major Hamilton was shot in the arm. Only a couple of men reached the top and the attack was repelled. General Cameron then ordered an assault by Captain Mayne of the Royal Navy with ninety sailors armed with rifles and cutlasses and, when this assault was also repelled, Commander Phillimore and a party of seamen charged up the ditch and threw hand grenades into the redoubt. This attack was also unsuccessful. With night approaching, the pa was surrounded by troops who camped in the ditch and occassionally threw hand grenades into the redoubt.
A pre-daybreak attempt on the 21st November by the Royal Engineers to mine the main pa failed when the fuzes could not be found. Shortly after daybreak, the defenders surrendered. Maori losses were 36 men and women killed and 183 prisoners; British losses were 38 killed and 92 wounded. The prisoners were eventually taken to Kawau Island from where they escaped in September 1864 and returned to the Waikato. General Cameron later disapproved of the war which he believed was being deliberately waged for the benefit of land-hungry settlers, and resigned in 1865. Captain Mercer died of his wounds on 25 November 1863; the town of Mercer is named after him. 'C' Field Battery, 4 Brigade RA, became 94 (New Zealand) Battery RA and is now known as 94 (New Zealand) Headquarters Battery, 4th Regiment Royal Artillery; it is based in Osnabrück, Germany. Two of its members were awarded the Victoria Cross for valour during the battle: Lt (later Colonel) Arthur Frederick Pickard traversed the parapets under heavy defender cross-fire to provide water for the wounded, and Assistant Surgeon William Temple provided medical aid to the wounded. The battle site is a popular tourist attraction. See also: | |