The Gun - GunfoundingAfter the manufacture of wrought iron guns ceased about 1520, all pieces of ordnance were sat until the middle of the 19th century when the demand for more powerful pieces saw other methods investigated. Founding or casting consists of pouring molten metal into a mould and allowing it to cool. After solidification the mould is removed and the casting remains, showing all the required details of form and ornamentation, if any. Although techniques to be described are those of the early 18th century founders of bronze ordnance, they differ only slightly from those employed by the mediaeval bell founders who had converted to gun founding in the 14th century. As methods of smelting iron improved it gradually superseded bronze, which by the early 1800s was being used for the lighter guns only. To cast a gun a full-size pattern or model was first made. Around the model a mould was then formed, after which the model was removed and the space it occupied filled with molten metal. After the metal had solidified and cooled the mould was removed revealing the piece, which then had to be finished by machining. Let us look at the process in more detail. Making the ModelThe barrel model was built up on a tapered wooden spindle of a size appropriate to the gun to be cast, with an extension at the muzzle end to form a 'dead head' or 'feeding head' intended to form a reservoir of molten metal in the mould. After being greased (to make removal easy later), the spindle was tightly wound with rope made of plaited straw to approach the form of the barrel to within a margin of one inch (25.4 mm). | |
|
Around the straw-covered spindle the actual shape of the barrel was then sculpted using layers of a paste made from clay, horse dung (!) and water, each layer being thoroughly dried before application of the next. This resulted in a model very close to the required size and shape. After the final layer had been applied the profile of the piece was checked with a template called a strickle. Finally the model was covered with a layer of molten wax and again smoothed by the strickle. This was to give the model a smooth surface to prevent it adhering to the mould, and to assist its removal from the latter. This last application of the strickle was used to accurately delineate decorative bands on the piece, as well as to locate the position of the trunnions. Next the trunnions in the form of turned wooden blocks shaped at the ends to suit the profile of the barrel were attached by iron skewers driven into the spindle of the model. In order to allow for contraction of the bronze on cooling all model dimensions were made greater than those on the design drawing by 2½ inches in 100 (63.5 mm in 2540 mm). |
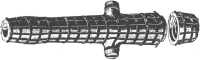
Foundation of the model.
|
The MouldThe mould was made by applying layers of a semi-liquid mixture of clay, potters' or refractory clay, sand | |
|
and water, all of which had been finely sifted or strained so it would flow freely into the smallest details of the model. Each layer was left to dry before the next was added. Ultimate thickness depended upon the size of the gun to be cast, about 3 inches (76 mm) for a 24-pr. The outside of the mould was formed to a pattern (checked by a template similar to the strickle mentioned above), so that standard reinforcing staves and hoops could be fitted (lower diagram opposite). After removing the skewers securing the trunnion patterns the model was removed from the mould, first by pulling out the tapered spindle, then unwinding the straw rope, after which the trunnion patterns were removed. Lastly the mould was stood on its breech end and a fire started at the bottom to melt the wax on the model thus making the clay part of it easier to remove without damaging the mould. |
|
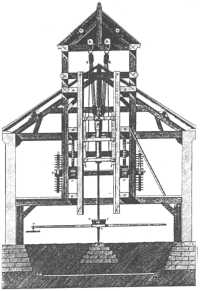
|
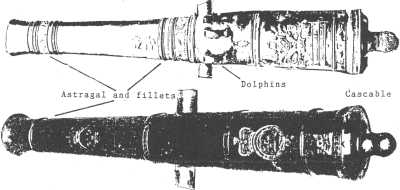
After removal of the trunnion patterns the ends of the trunnion holes in the mould were squared off and covered by tiles suitably secured. Note that the mould had first to be made open at both ends to enable the model to be removed, hence a separate model and mould had to be made for the breech and cascable. The breech mould was then attached to the main mould. After the complete mould had been made ready to take the molten metal it was placed breech end down in a pit adjacent to the furnace and surrounded by tightly rammed earth for its entire length. The molten metal was then run into the mould to the top of the dead head. Twenty four hours after the pour mould and casting had cooled sufficiently to permit their being dug out and removed from the pit. Further cooling enabled the staves and hoops to be removed. The mould material was then broken away from the casting, the latter being cleared of rough burrs and crust with hammer and cold chisel, after which the dead head was sawn off. Thus each mould could be used once only. OrnamentationWith the exception of decorative bands called 'astragals and fillets', the 18th century gun featured no embossed , ie raised, decorations but earlier ordnance frequently included them in abundance. Indeed, many pieces were considered works of art, and still are. But works of art are often expensive, especially when skillfully executed. Models of the embossed features had first to be carved in wax, then carefully attached to the main model. During the removal of the latter from the mould heat was applied to melt the wax, thus leaving cavities of the required shape later filled by molten metal. Not only was the production of these decorations expensive, it was also time-consuming, requiring the employment of highly skilled artists - nor did they make the slightest difference to the ballistic performance of the gun. Also embossed decorations hampered machining operations because where they occurred the piece could not be turned but had to be planned. Lastly, if the gun failed at proof the cost was money down the drain as it were.
Common sense prevailed; with the exception of astragals and fillets, many of which were simplified or dispensed with, embossed decorations had largely disappeared by the 18th century, and no marks of any kind appeared on a gun before proof. If it passed proof necessary markings only were engraved on the metal, ie cut with hammer and chisel. They were usually limited to the Royal Monogram, weight, date of manufacture, the broad arrow (signifying Government ownership) and the register number. On brass ordnance the monogram of the Master General of the Ordnance (after 1855 the Secretary of State for War) was also engraved on the chase. Thus if the gun failed proof much less time and money were wasted than with the older system. As iron gradually superseded bronze guns became even plainer because in casting iron did not lend itself so well to the reproduction of intricate designs, particularly of an embossed nature. Essential marks only were engraved after proof. A feature of early guns was the incorporation of lifting handles at the centre of gravity called 'dolphins' which animals they were made to resemble. They had first to be carved in wax as with other embossed decorations already mentioned. However, Gunners at last realised that one end of a sling around the cascable and the other round a piece of skidding inserted in the muzzle was a better way to lift a gun. Lifting handles were soon made plain, ie lost their dolphin shape, and by the end of the 18th century were becoming rare. Gunfounders Think BigAs casting superseded the wrought iron built-up system of ordnance construction around 1520, Gunners demanded cast guns in similar calibres, including examples capable of handling the huge stone shot still in vogue for siege operations. As the technique of casting iron was still in its infancy in western countries, heavy pieces were cast in bronze or similar alloys, eg 'latten', a type of brass. Some very interesting pieces resulted. | |
While besieging Constantinople in 1451 the Turks actually cast a number of guns on the spot! They were about 17 feet (5.18 metres) long, of 25 inches (63.5 cm) calibre, and threw stone shot of about 676 lbs (306.6 kg). They remained serviceable for almost 400 years - to the chagrin of the Royal Navy, ships of which suffered significant damage as well as several casualties in 1807 while attempting to force the Dardanelles where some of the guns had been mounted. Another great piece, 'Mukh-el-Maidan' (master of the Plain) cast at Ahmednuggar, India, in 1548 by a Turk, was of 28.5-inch (72.39-cm) calibre and fired a 1000-lb (455-kg) shot with an 80-lb (36-kg) charge of powder. Last fired during the 18th century, legend records that all pregnant women in the vicinity miscarried!
| One of the Dardenelles guns now at the Tower of London. Made in two pieces and screwed together both for ease of manufacture as well as transport, it is recorded that when unscrewed the threads were as clean and sharp as they must have been when the gun was first made. How the threaded portions were crafted centuries before the invention of the heavy screw-cutting lathe is most intriguing. The gun weighs a total of 16 tons 16 cwt (17.069 tonnes). |
The largest gun ever made (until 1944) was the Tsar Pushka, the Great Gun of Moscow, cast in 1586. Of 36-inch (91.4-cm) calibre, it would have fired a shot of around 2400 lbs (1091 kg), although there is no record of its ever having been fired. |
 'Tsar Puschka' or The Great Gun of Moscow. Not to the same scale as the image above. Length approximately 5 metres. Calibre 36 inches (91.4 cm). |
Machining OperationsPrior to the 18th century, guns were cast round a core or 'kernel bar' built up from wire and clay over an iron spindle somewhat smaller than the required bore. Therefore after casting the gun was left with a | |
| rough hole which had to be bored to the specified calibre. The method was far from satisfactory for sometimes the core shifted during the casting process so that the axis of the hole did not end up coincident with the axis if the piece. Boring did not always rectify the fault because in the primitive machines then in use the boring bar tended to follow the existing hole. Also, the hard crust left in the hole by the casting process shortened the life of the boring tool to an inconvenient extent. The answer was to cast the gun solid and drill and/or bore the bore in stages, a system adopted in Europe in 1747 and in Britain in 1774. | 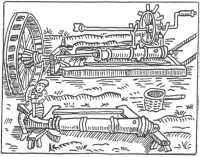 Early water-driven horizontal boring machine. The workman is removing the 'dead head'. |
Although crude horizontal boring machines driven by water power were at first used, these appear to have been superseded in the 18th century by a vertical variety driven by horses. However, in the vertical machine in which the drill rotated while the descended by its own weight, precise alignment of the drill with the axis of the piece was difficult to maintain, so it was eventually decided to revert to the horizontal type. The latter, in which the gun rotated while the drill or boring bar remained steady, could be set up on a much firmer foundation, and therefore produced a more precise job. As a further advantage the horizontal machine enabled the outside of the piece to be machined at the same time as the bore. Boring and turning completed, the vent was then drilled by two men with a hand-operated drill. | |
| A one or two horse-power machine or 'mill', as it was sometimes called, for drilling and/or boring the bore of a gun. Superseded during the 18th century by the horizontal machine below.
|
 |
|
After venting, the trunnions were machined. The gun was positioned with its trunnions vertical, after which about a quarter of an inch (6.35 mm) of the uppermost trunnion was brought to the proper size by file and chisel. Upon it was then placed a circular box with a cutter fixed on its underside, while on the upper part was fixed a vertical spindle with a heavy weight pressing down upon it. Levers were then attached to the spindle, and two men kept walking round and round rotating the box until the length of the trunnion had been machined, the end being finished with file and chisel. The men then repeated the performance on the other trunnion - and hoped the axes of the two were somewhere near being in the same straight line, and that this line was at right angles to the axis of the piece! With the coming of steam power (1845 in Woolwich), the hand-finishing of trunnions ceased with the introduction of a special trunnioning machine which ensured their accuracy in all respects. Power drills, eg for drilling vents, were also introduced. | |
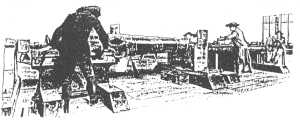 |
Horizontal lathe of early 18th century. The man on the left is turning the outside of the piece while the one seated on the far right is feeding the boring bar into the bore by rack and pinion gearing. |
Until the invention of the lathe slide rest turning was done by holding the tool in the hand, a slow and laborious business. The lathe was driven literally by horse-power via a shaft directly connected to the lathe spindle through the wall to the left of the operator. | |
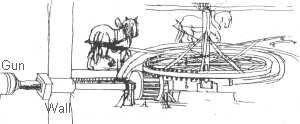 |
Horse-powered driving machine. The lantern wheel (centre bottom, marked A) is about two feet in diameter and the large wheel (B) 11 to 12 feet. |
The 'think big' guns described earlier were not machined, merely cleaned up after casting. ProofImmediately after casting during cleaning up, a visual inspection of the exterior of the piece was made to detect any obvious surface flaws which exceeded accepted limits. After machining the interior of the bore was first examined for 'spongy' areas or cavities, a process known as 'searching', the implement used being called a 'searcher'. It consisted of a wooden stave at one end of which were a number of wire points designed to catch in any cavity when moved around in the bore. The points could be retracted by a ring which slid up the stave. Another form of searcher was designed to take a wax impression of any cavity detected which, if 1/9 inch or more in depth caused the gun to be rejected. The earliest reference to the searcher occurred in 1635. Another test was to suspend the gun by the muzzle, fill the bore with water, and observe the outside of the piece for seepage indicating porosity of the metal. During the 18th century a more severe test was introduced by putting the water under high pressure, but was discontinued in 1780 as being unnecessary for bronze guns. The bore was gauged for accuracy and straightness, tolerances being pretty liberal - at one time plus or minus 0.1 inch (2.5 mm) for calibre! Having passed the above tests the gun was then fired with charges well above the maximum service charge, often being double-shotted as well. There followed another visual inspection and examination after which the gun, if found serviceable, was passed to the engravers. A weakness in a bronze gun appearing after proof usually took the form of a bulge in the barrel, which of course meant rejection. Cast iron guns were not so considerate; they invariably burst during firing. Consequently Gunners of the smooth-bore era naturally preferred to serve on bronze guns rather than on iron! WL Ruffell previous | index | next | History index | Home | |